Aloha Friday: Grill Fail to Grill Win

A couple of days ago, I posted about my Grill Fail.  Well, yesterday we tried again.  This time I had some new tools and was all set.  I put the coals in and lit them.  For awhile, things weren’t looking so hot.  Literally.  The coals seemed to refuse to stay lit.

Just as we were deciding to give up, I gave it one more try and success!

IMGP9693

Before long, we had hamburgers and hot dogs for dinner.  We only had hot dog buns, so we split the burgers in half and put them on the hot dog rolls.

 IMGP9706

NHL, B and I each ate two hot dogs and one hamburger.  JSL ate one… hot dog bun.  (He’s extremely picky and barely tasted the hot dogs or burgers.)

With this initial success under my belt, I want to do two things.  First of all, I want to buy a chimney starter.  This should make starting the coals a lot easier.  Secondly, I want to try some other things on the grill.  Turkey burgers and chicken breasts are a sure thing.

Another possibility is salami.  My father used to slice salami, grill it and then serve it atop rye bread.  Delicious!

My Aloha Friday question for today is: Do you have/use a grill?  What do you grill on it? 

Don’t forget to enter my Dinosaur Train giveaway.  You could win Dino Poop and Hatchers.


Thanks to Kailani at An Island Life for starting this fun for Friday. Please be sure to head over to her blog to say hello and sign the McLinky there if you are participating.

Aloha Friday by Kailani at An Island Life

Aloha #89

Grilling Fail

P1030136Last year, I won a Weber Grill and grilling utensil set during a Twitter party.  The grill arrived and I hastily assembled it.  If by “hastily” you mean “let it sit in the box in our living room for a month and only put it together and took it out because B was going to kill me.”  With the grill all set up, I proceeded to not use it.  For one reason or another, I just didn’t get to use it during the rest of the summer or fall.  Winter came and away the grill went.

With spring here, I decided that we should grill.  I remembered that the instructions had said to heat the grill for one hour prior to first use.  Unfortunately, this meant that I couldn’t use the grill during the week.  (Waiting an hour and *then* cooking time seemed excessive.)  Weekends were perfect, but it seemed like every day brought rain.  No way was I going to be standing over the grill with an umbrella!

Finally, this past Sunday, we had nice weather.  B went to the store to get some hot dogs and hamburgers.  When she got back, I went out, put some charcoal in the grill and tried to light it.  Sadly, the wind quickly put out any flame I lit.  Undaunted, I recalled a trick about using newspaper.  So I got a single sheet of newspaper, arranged it among the charcoal and lit the paper.

P1030135Sure enough, I got a nice, big flame.  I also got pieces of paper shooting off.  Too late, I noticed some vines (waiting to be bagged) that had potential for catching on fire.  The hose was close, but not on.  Fail #1.  Luckily, nothing caught on fire, but lesson learned.  Next time, I’ll turn the hose on before I light the grill to cut down on any fire extinguishing delay.

The next fail came soon after.  I had the grill all ready now and going nicely.  I began to picture the hamburgers and hot dogs on there cooking away with me flipping them using… uh oh.  Where were my utensils.  During the winter, we put the utensils away.  For the life of us, though, we couldn’t remember where.  Taking turns (as we weren’t comfortable leaving the grill unattended), we looked and looked to no avail.  The utensils *are* in our house.  Somewhere.  But “somewhere” doesn’t help me flip burgers.  Fail #2.

It was too late to go out and buy new utensils, so I let the grill burn for the hour, snuffed the flames and put the grill away (after it cooled down).  The next day, I looked into some new utensils.  On the way home, I bought a new spatula, tongs, and grill brush from Lowe’s.  Tomorrow’s weather is looking good so here’s hoping that My First Grilling Take Two is more successful than Take One was.

Don’t forget to enter my Dinosaur Train giveaway.  You could win Dino Poop and Hatchers.

Duncan Hines Triple Chocolate Decadent Cake Mix and Chocolate Glaze Review

A couple of weeks ago, I wrote about the Duncan Hines Apple Carmel Cake Mix and Vanilla Glaze.  For the review, I was also given a box of Triple Chocolate Decadent Cake Mix and Chocolate Glaze.  I figured it was only fair to review this one as well.

IMGP1787

This time, instead of a bundt cake, I decided to make cupcakes.  As with the Apple Carmel mix, I was surprised by the filling.   It wasn’t just powdered chocolate.  It had chocolate chips and chunks inside as well!

IMGP1791

During my cooking, I acquired a little helper.  Here’s JSL stirring the filling.

IMGP1792

When it was all mixed, it took a lot of willpower to not scarf down the filling right then and there.  Maybe they should include 2 packets of filling in each box.  One to put in the cake and one to eat immediately!

IMGP1794

Next, we mixed up the cake batter itself.

IMGP1805

The cake mix went into the cupcake wrappers and then the filling gets placed on top.

IMGP1818

Here’s the worst part… The waiting.

IMGP1820 

Soon enough, though, the cupcakes were done.  Notice how the cupcake rises around the filling, leaving most of it inside the cupcake.

IMGP1830

Next, for the frosting.  Like the vanilla frosting before, this was simple.  Remove the bottle’s cap, microwave the bottle for 30 seconds, put the cap back on, and frost.

IMGP1844

I’ll admit, my frosting method was haphazard, but I still think these look like some nice cupcakes.

IMGP1846

Want to take a peak inside?  Here it is in all its ooey gooey chocolatey glory.

IMGP1900

Of course, cupcakes can look like the most delicious things in the world, but if the taste doesn’t back it up, the appearance is worth nothing.  The taste most certainly backs up the appearance.  B wasn’t a fan of the filling, but then again she’s not a chocolate fanatic like my boys and I am.  They devoured the cupcakes they were given and NHL asked for more.

IMGP1860

You might wonder why there’s no photo of NHL eating his cupcake.  That would be because in the time it took me to put down JSL’s cupcake, seat JSL, and grab a cupcake for myself, NHL had finished his cupcake.  I’d say that’s a thumbs up from NHL.  Now, if you’ll excuse me, the remaining cupcakes are calling me and I must try to resist their siren’s call.

Disclaimer: This post was written for Family Review Network & Duncan Hines who provided the complimentary product for review in exchange for my honest opinions.

Cooking With TechyDad: Fudge

Last year, I wrote a pair of blog posts about some fudge I made.  During the year, I meant to do a Cooking With TechyDad segment about the fudge, but never got around to it.  With the holidays in full swing, I decided to pull out the old fudge recipe again and this time I took photos.  Let’s begin shall we.

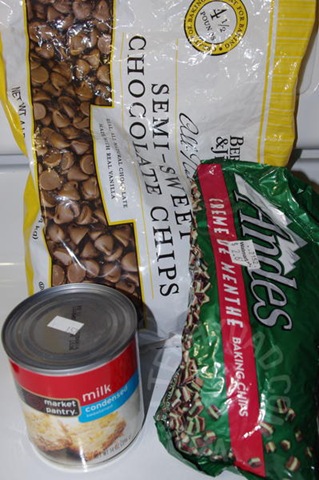
First, of all, you’re going to need to devote your full attention to the fudge for 10 minutes or so.  So lay out your ingredients ahead of time and make sure there won’t be any distractions.  For the ingredients, you’ll need chocolate chips, sweetened condensed milk and vanilla extract.  You can also add a mix-in.  I like using Andes baking chips, but you can also use mini-M&Ms (the big ones are nice too but leave the fudge tough to slice), peanut butter chips, nuts, etc.  If you don’t want to use a mix-in, no problem.  Plain fudge tastes good also.

IMGP1368 IMGP1731

Now that your ingredients are out, get an 8 inch by 8 inch baking pan and line it with aluminum foil.  Lightly grease this with cooking spray.

IMGP1369

Now, measure out 2 cups of chocolate chips and 1 1/2 cups of your mix-in (if using).

IMGP1373 IMGP1378IMGP1400

Put the chocolate chips in a small saucepan and pour in the condensed milk.

IMGP1374 IMGP1376 

Now stir it over low heat for about 10 minutes or until smooth.

IMGP1382

It won’t look like it’s doing much, at first.  Then it reaches what I like to call the “chunky chocolate milk” stage.  (That’s a technical term.)

 IMGP1385

As you can see below, we’re almost ready, but it is still a bit lumpy.

IMGP1386 

Ok, *now* we’re done.

IMGP1388

At this point, you need to act fast.  Removing the fudge from the heat long will cause it to harden up in your saucepan and nobody wants that.  First, toss in any mix-ins you might be using and give the fudge a few stirs to distribute it all around.

IMGP1389

Now, pour the fudge into your 8 inch by 8 inch pan.  Smooth it out as best you can, but don’t worry about it looking perfect.  Jagged edges are part of homemade fudge’s charm.

IMGP1391 IMGP1393   IMGP1404  IMGP1403

Stick the fudge in the fridge for 1 1/2 hours (overnight is fine too).  This happens to be one of my favorite parts.  No, not putting the fudge in the fridge.  Scraping the pot and eating the bits of fudge left behind. YUM!

IMGP1408

Once your fudge has set, take it out of the fridge, remove it from the pan and carefully peel off the foil.  (Some might stick to it, but it should all come off relatively easily.)

IMGP1415

Now you have a big block O’ fudge.

IMGP1418

This is nice and all, but I don’t think it looks nice to be nibbling on a hunk of fudge that size.  So let’s slice it.  Since it was in an 8×8 pan, it’s only fitting to cut it into 8×8 slices.  This way, each piece of fudge is 1 inch by 1 inch (approximately).

Make the first slice about halfway in.

IMGP1419

Next, cut each of these pieces in half and each of the resulting pieces in half.  Now, you have 8 strips of fudge.

IMGP1421

Turn the fudge 90 degrees and repeat the cuts.

IMGP1422

There you go!  64 pieces of wonderful fudge.

 IMGP1423

Here’s a close up of the mint, plain and M&M fudge I made.

IMGP1425 IMGP1429  IMGP1432

This recipe makes a *lot* of fudge.

IMGP1434

You could easily make a few batches, wrap them up nicely (e.g. using those Chinese food containers that you can buy from craft stores) and give them as gifts.

Now, if you don’t mind, I think I’ll eat a piece of fudge.  *om nom nom nom nom nom nom nom*

Duncan Hines Apple Carmel Decadent Cake Mix and Vanilla Glaze Review

I love cooking and baking.  (Maybe you could tell from my Cooking With TechyDad posts.)  While I appreciate creating dishes from scratch, I’m not ashamed to turn to box mixes either.  So when I was given the opportunity to review Duncan Hines’ new Decadent cake mixes and glazes, I jumped at the chance.

IMGP1303

I received the Apple Carmel and Triple Chocolate cake mixes and the Vanilla and Chocolate glazes.  The chocolate (both glaze and mix) review will appear in a week or so.  For now, I’d like to focus on the Apple Carmel cake mix and Vanilla glaze.

 IMGP1308

First some information on the cake mixes and glazes:

Duncan Hines®, the well recognized brand that has been helping families create delicious memories for 60 years, introduces the latest breakthrough in deliciousness at the baking aisle – Decadent Cakes and Glazes. Only Duncan Hines now offers the most premium, indulgent cakes that one can find outside of a bakery. Duncan Hines new Decadent Cake Line with two new incredibly indulgent offerings – Duncan Hines Decadent Triple Chocolate Cake with real chocolate chunks and rich fudge and Duncan Hines Decadent Apple Caramel cake with real apples and rich caramel. With more people entertaining at home and looking for better quality desserts, these decadent cakes are perfect. Both cakes contain zero grams of trans fat and NO hydrogenated oils. They are available in cake baking section of supermarkets nationwide in 20 oz size boxes at a SRP of $2.99.

Simultaneously, Duncan Hines launches Decadent Glazes, a one of a kind glaze designed to elevate the baking experience with a whole new way to top your desserts. Available in Chocolate and Vanilla, Decadent Glazes help home chefs create spectacular desserts with professional results. Only Duncan Hines offers this versatile topping to complement your baked goods or any dessert with a touch of sweetness and flavor. What separates Decadent Glazes from frosting is they are not as heavy or sweet as frosting and are convenient to use. These glazes are available in a 10 ounce squeeze bottle at an SRP of $2.49.

Ok, now on to the cooking.  The mix includes two components.  The normal “cake mix” portion and the caramel mix-in portion.  These were really simple to prepare.  Mix in the required ingredients into separate bowls and you’re good to go.

IMGP1316 IMGP1315

Notice the lumps in the cake batter.  No, I didn’t neglect to stir enough.  Those are apple chunks.  We’re not talking apple flavoring here, but actual apple chunks!

For a normal cake, the caramel would go in first followed by the apple cake mix, but I decided to make this as a bundt.  This meant mixing the batter first and then tossing it all into my bundt pan.

IMGP1320

Baking took longer than the box said, but I attribute this to the bundt pan versus normal cake pan.  As with any mix, you should use the box listed times as guides but realize that many factors (e.g. oven temperatures) can change cooking times.  In any event, I was soon greeted with a finished apple-caramel cake.

IMGP1322 IMGP1323

I let the cake cool overnight and the next day it was glaze time.  I was impressed by how simple this was.  Simply remove the bottle’s cap, microwave the bottle for a short while, replace the cap and pour your glaze.  Leftover glaze (and we had lots left over) can be refrigerated for later microwaving.

IMGP1328 IMGP1333 IMGP1338

Looks delicious, doesn’t it?

IMGP1341

Here’s a slice….

IMGP1350

… Oh, rats.  I just realized we haven’t perfected web-to-plate delivery technology.  Oh well, take my word for it, this was quite tasty.  The cake was extremely moist and the glaze was sweet but not overpoweringly so.  The cake didn’t last long at all and now I’m itching to try the chocolate ones (as I’m a huge chocoholic).  This is definitely a product I’d recommend and one I’d eat again.

Disclaimer: This post was written for Family Review Network & Duncan Hines who provided the complimentary product for review in exchange for my honest opinions.

1 2 3 4 5 6 13